|
|
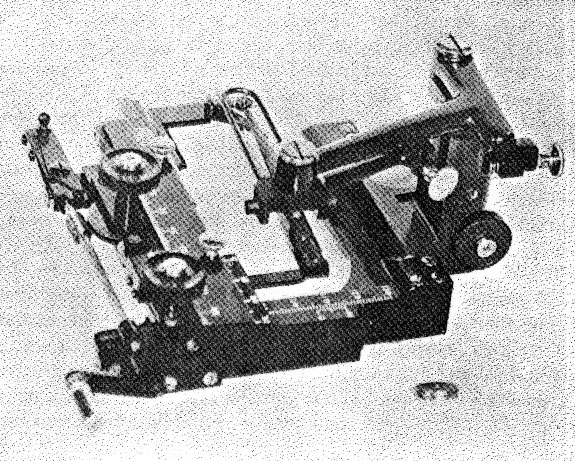
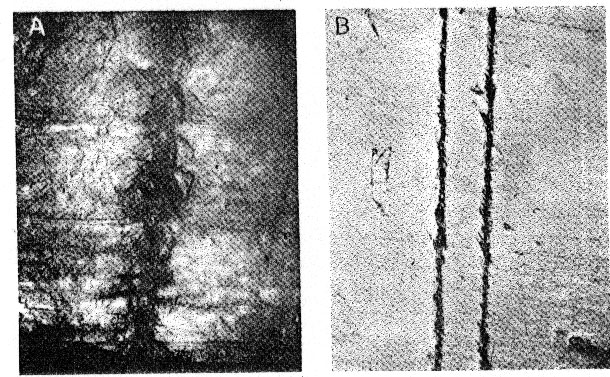
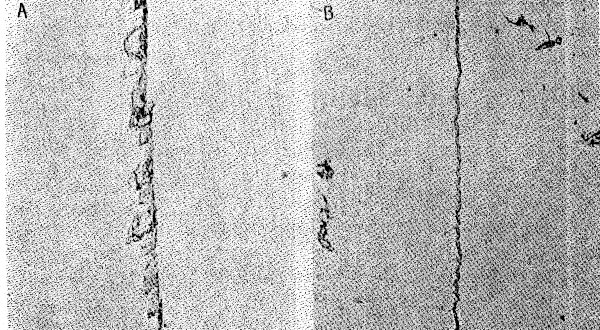
Volume 19, pages 161-168, 1934 THE "MICROHARDNESS" OF MINERALS COMPRISING THE MOHS SCALE HAROLD C. HODGE1 and J. HAROLD McKAY,2 The University of Rochester School of Medicine and Dentistry, Rochester, N. Y. For many years the estimation of the hardness of minerals has been based on the relative hardness of the minerals comprising the Mohs scale. It has been impossible to make hardness measurements with the Brinell or Rockwell tester on mineralogical samples because of the great forces involved, resulting in shattered crystals. In general, many other hardness testing methods are subject to this condition in a greater or lesser degree. It is true that obtaining an estimation of the hardness of the minerals in the Mohs scale, using; one of the standard hardness testers, is mainly of academic interest. However, since this scale has had such widespread use and since the studies3 of the hardness increments between adjacent steps have given, for the most part, discordant results, we have believed it pertinent to undertake a preliminary study, using the microcharacter,4 a standard hardness tester designed for work on bearing metals. The microcharacter (Fig. 1) consists essentially of a tiny diamond ground to the corner of a cube; this is sharp at a magnification of 2000 diameters. The diamond is mounted in such a manner as to operate (1) with the diagonal of the cube at 90 degrees to the test surface and (2) with the edge of the cube entering the test material at an angle of 35.25 degrees, as the latter is moved under the cutting point. A constant load is maintained by means of a small weight mounted on a lever-spring system regulated by a screw and indicated by a spirit level. This instrument gives a readily reproducible cut (called "microcut") whose width can be measured by means of a microscope having a filar micrometer eyepiece, and translated into a microhardness number. The microhardness is obtained by multiplying the reciprocal of the square of the width in microns by 10,000. We are presenting a new method of determining the hardness of minerals which we believe to be capable of considerable accuracy. In competent hands, the interpretations obtained should be as accurate as those obtained with any other instrument, as there is absolutely no distortion. Cuts in different directions readily indicate whether (because of the angle of incision) any given cut has crystals torn from either or both edges. It has been found that cuts showing fractured edges may be discarded or readings may be taken at the narrow necks (Fig. 3-A). As would be expected the readings at the narrow neck are found to check very closely with the readings on uniform smooth cuts, made in other directions (Fig. 3-B). We have undertaken to obtain microhardness values for each of the nine minerals from talc to corundum, using the microcharacter. Since the problem became of interest during the course of another investigation, this is not an exhaustive study, but, inasmuch as our results are fairly concurrent, we have tabulated our data herewith. These data were obtained as indicated upon microcuts made on different surfaces and crystal faces; parallel cuts being made in various directions and in opposite sense to assure uniformity and also for the purpose of checking microhardness values. I. TALC The piece of talc studied was of the variety known as foliated. In order to study the talc it was necessary to embed it in a fusible alloy. The surface parallel to the principal plane of cleavage was cut first, in directions parallel but in sense opposite and second, in a similar fashion at right angles to the first group of cuts. Wide variations were found in the width of the microcut (Fig. 2-A) running from a width of 20 microns to almost 200 microns. These variations are interpreted as evidence that a number of different grains at different orientations had been cut through, at times perhaps chipping out entire groups of grains. This interpretation is made more probable when practically no reproducibility of the wide areas in the cut are found by making another cut parallel to, and in the same sense at a distance of two or three mms. from the first cut. A series of six paired cuts, in the same direction but opposite sense, gave average widths of 63.7, 60.6, 103.7, 69.4, 121.0 and 47.7 microns or an average of 77.8 microns. The microhardness corresponding to a width of 77.8 microns is defined as 10,000/(77.8)2 or 1.6. A series of four similarly placed cuts, on the same surface but at 45 degrees to the first series, gave average widths of 159.7, 75.5, 74.7, and 132.7 microns or an average width of 110.8, which is equivalent to a microhardness of 0.8. A series of two similarly placed cuts on the same surface, but at 90 degrees to the first series, yielded average widths of 104.2 and 102.8 microns, or an average width of 103.0 microns which gave a microhardness of 1.0. In order to test the changes of hardness, if any, which occurred on different surfaces parallel to the one first studied, the crystal was split and cuts made as before on the new plane. Confirmatory data in every respect were obtained. A series of our microcuts similar to the first series gave average widths of 73.4, 100.4, 74.7 and 91.2 microns, or an average width of 84.9 microns which gave a calculated microhardness of 1.4. On the same surface but with microcuts at 90 degrees to the first series, a series of two microcuts gave average widths of 110.9 and 70.5, or an average width of 90.9 microns and a microhardness of 1.2. The average width of all the series on the surface parallel to the cleavage surface is 93.6 microns, which was equivalent to an average microhardness of 1.1.
FIG. 2-B. Talc. (Original magnification approx. 100 X.) Two microcuts in opposite sense on surface perpendicular to cleavage surface. Microcuts across trace of cleavage planes. Average width of microcut, 21.4 microns. Average microhardness, 21.5. Sections were next cut vertically across the end and across one side of the specimen of talc. These vertical cross sections were mounted in a fusible alloy and microcuts were made in various directions, and always in pairs, one in opposite sense to the other. Here, surprisingly, microcuts (Fig. 2-B) were obtained about 20 microns wide and of a fair uniformity. A series of six microcuts across the trace of the cleavage plane gave average widths of 22.8, 19.9, 19.1, 22.8, 20.7 and 22.8 microns, or an average width of 21.4 microns from which a microhardness was computed of 21.5. A series of six microcuts along the trace of the cleavage plane produced average widths of 21.6, 19.9, 23.6, 24.8, 22.2 and 21.8 microns or an average width of 22.2 microns which gave a microhardness of 20.0. It is to be noted that the average hardness of talc on the cleavage surface first studied is represented by a microhardness of approximately 1, while the average readings on the vertical cross sections gave a microhardness of 20 and 21.5. II. SELENITE In selenite, the hardness on the clinopinacoid, pyramid and prism planes, i.e., {010} , {111}, and {110} planes respectively, were studied by means of microcuts in various directions. In general, cuts of two different variations were obtained, one quite regular and with fairly smooth edges, the other with one smooth edge and one irregular edge having had crystals torn out. The microhardness on the {010} and {110} planes were similar and gave an average width of cut which translated into microhardness varied from 10 to 13. A series of two microcuts in the clinopinacoid plane gave average widths of 28.8 and 31.4 microns, which yielded microhardnesses of 12.0 and 10.2 respectively. A series of seven cuts on the prism face produced average widths of 28.6, 30.0, 27.9, 31.1, 31.2, 28.6 and 28.1 microns, which resulted in microhardness determinations of 12.2, 11.1, 12.9, 10.5, 10.4, 12.2 and 12.8 respectively. The microcuts on the {111} plane showed a much greater hardness and gave values ranging from 25 to 57. A series of four cuts on the pyramid face resulted in average widths of 19.5, 18.1, 17.5 and 13.2 microns, from which microhardnesses were computed of 26.3, 29.5, 32.7 and 56.6 respectively. This last value may be in error inasmuch as the measurements were made on a crystal face which was marred by a large occlusion of an unknown nature. III. CALCITE
The cleavage faces or {10 FIG. 3-13. Calcite. (Original magnification approx. 250 X.) Microcut in crystal face showing regularity of edges. Average width of microcut, 8.8 microns. Average microhardness, 129. IV. FLUORITE The specimen of fluorite had only one surface suitable for examination, a {111} face. Values in the same direction but opposite sense showed a somewhat high degree of uniformity. A series of two microcuts gave average widths of 8.47 and 8.31 microns or an average width of 8.36 which is equivalent to a microhardness of 143. V. APATITE
The microhardness of the {0001} and {10
VI. ORTHOCLASE Only the {001} or basal pinacoid face was examined. The microcut was somewhat jagged. A single microcut averaged 3.19 microns in width and gave a calculated microhardness of 975. VII. QUARTZ
The rhombohedron {1011} and the unit prism {10 VIII. TOPAZ The single face studied here was probably a prism face. The cuts were jagged and the readings obtained were of a poor degree of uniformity. A single microcut gave an average width of 1.71 microns; a single microcut at 90 degrees to the first also resulted in an average width of 1.71 microns, or a microhardness of 3420. IX. CORUNDUM (variety Sapphire) The face cut was the rhombohedron {1120} face. Two microcuts were clean and smooth and gave widths of 1.38 and 1.43 microns. The microhardnesses determined were 5270 and 4980. A compilation of our average data is offered in Table I. TABLE I. TABLE OF AVERAGES.
When the data obtained are plotted as abscissae against the number of the appropriate mineral in Mohs scale a curve more or less logarithmic is obtained in which there is as much difference between the numbers 8 and 9 as there is between 6 and 7, and in which the magnitudes of the microhardness for minerals 1 to 6 are small in comparison and of a more nearly uniform microhardness increment. The difference in microhardness between 7 and 8 is smaller than the differences between 6 and 7, and between 8 and 9. These results, however, are only approximate; specimens with different compositions might give other microhardness values. It is suggested that the microcharacter may be applied to a more complete study of the hardness of minerals, particularly in regard to (1) the hardness changes produced by changes in composition; (2) the hardness changes produced in variously oriented crystals in an aggregate; or (3) the study of hardness with a view to the identification of the components of aggregates. We believe that this method of attack may suggest further opportunities for research on mineralogical problems. ACKNOWLEDGMENT The authors wish to express their indebtedness to Mr. C. H. Bierbaum at whose suggestion the estimation was undertaken. They also wish to thank Dr. Q. D. Singewald and Professor Harold L. Alling of the Geology Department of The University of Rochester for their technical advice.
NOTES 1 Rockefeller Fellow in Dentistry. 2 Metallurgist, Lumen Bearing Company, Buffalo, N. Y. 3 Auerbach, F.,* Wied. Ann. Phys., 1891, p. 61; 1892, p. 262; 1894, p. 1000; 1896, p. 357. Borgström, L. H., Geol. For. i. Stockholm förh., 1921, p. 521. Jagger, T. A., Zeit. Kryst. u. Mineral., 1898, p. 262. Karlström, S., "Physical, Physiological and Pathological Studies of the Dental Enamel" Fahlcrantz, Stockholm, 1931, p. 31. Pfaff,* Munch. Ber., 1883, pp. 55 and 372. Pöschl, V.,* "Die Härte der festen Körpen and Ihre physikalisch-chemische Bedeutung," Dresden, 1909, p. 84. Proell and Schubert, Zeit. Stomat., 26, 1928, p. 1047. Rosiwall, E.,* Verh. K. K. Geol. Reichsanst., 1896, p. 475; 1916, p. 117. * References marked with* are quoted from bibliography of Karlstrom. 4 Bierbaum, C. H., Study of Bearing Metals, A.I.M.E., February, 1923. The Michrocharacter, A.S.S.T., September, 1930. [var:'startyear'='1934'] [Include:'footer.htm'] |


